


Multi-user setup is a bit more complicated but is well worth the effort. Once setup, your data will be much safer and much less prone to corruption. The clients have no direct access to the data files. All data access is done via the file server program. If a client computer crashes or (more likely) is turned off by a novice user, there will be no file corruption or damage to any files. All clock in and out times are also taken from the computer running the server.
The Power Clock server
Install the Power Clock Server on only one workstation or server on your network. This is where your data files will be kept. The folder you install the server to and the data folders should NOT need to be shared. This is a change from Power Clock 4.16 and earlier. The clients use TCP/IP protocol to communicate with the server. No file sharing is involved.
You will need to ensure that all workstations and the server have TCP/IP protocol installed in Windows. TCP/IP protocol is installed by default on all recent versions of Windows.
Insure the server configured properly and is active. Specifically check these settings in the server from the Config menu:
General (Ctrl + G)
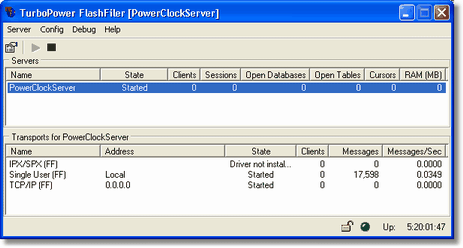
Server Name: Make sure a server name is entered. By default the server name is PowerClockServer.
Bring Server up automatically: Should be checked.
Network (Ctrl + N)
Winsock TCP/IP Transport Enabled: Should be checked.
Network interface: <ALL INTERFACES> should be selected.
If the server is active the server name will be shown in the top status window on the main screen and the state will be 'Active'. The green 'Start' button will be grayed out and the 'Stop' button will be black and active.
If the server status is inactive you can start it by clicking the green 'Start' button.
The client (powclk.exe) can be installed either on the server or on each individual workstation. It is best to install it only on the server in it's own shared directory. Then create shortcuts on each workstation. The shortcuts will load the executable file PCLOCK32.EXE from the server.
To make a shortcut on a workstation right-click on an empty area of your Windows desktop. Select New, then Shortcut. Click the browse button to browse your network drive where you have installed the Power Clock client. Find the PCLOCK32.EXE file. That will be the target of the shortcut.
Installing it only on the server allows you to easily update it with a new version. You only have to install the new version on the server and all the workstations will use it.
You can still install the client on each individual workstation but you will have to make sure all stations have the exact same version installed.
After you get the server and client installed you will need to set the location of the data files. Get the Power Clock server up and running first on your server computer. It will show as an icon in the system tray if it is running.
Now start the client program Power Clock (pclock32.exe).
Select "Data Location" from the View/Edit menu.
Setting the network data location in the client
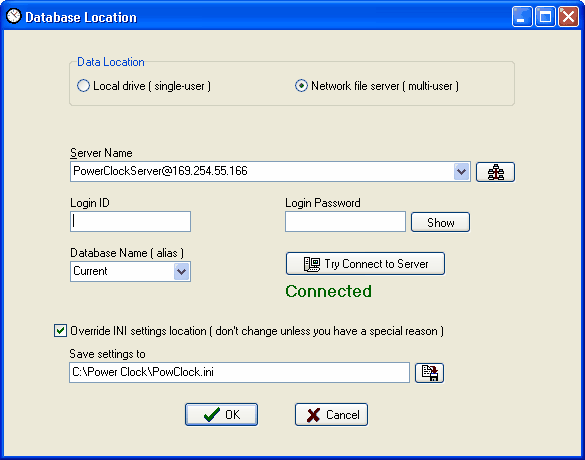
Data Location
Select 'Network file server' as the data location. Power Clock will begin searching for servers.
Server Name
In the Server Name combobox you should see your server listed as something like: "PowerClockServer@192.168.1.101". This is the same format as an internet email address. If you see your server listed then select it.
If you don't see your server listed then enter the server name and IP address. This will be something like "PowerClockServer@192.168.1.101". The method for finding the IP address on a computer varies depending on which version of Windows is running. If you don't know how to find your IP address then a good tutorial is on the internet at this site: Windows network setup
Enter "PowerClockServer@127.0.0.1" to connect to a server running on your own computer for testing.
On LANs you can click the "look for servers" button
After a short pause you should see one or more entries in the server name list box with the server name and IP address. You should select the server entry that has the IP address of your network file server.
If you don't see your server listed after you click 'Look for Servers' then there is probably some problem with your network or you don't have the server active. For internet based servers you must manually add the server to the data locations list. Internet based servers will not be detected by clicking 'Look for Servers'.
Login ID and Password
Leave these blank unless you have entered a password in User Permissions section of the server. If you setup your Power Clock server with a login ID and password then enter those here.
After entering the server IP address and login information, click
Database Name
This should be set to 'Current' in most cases. You may want to set it to 'Sample' to use the sample data. The database name must be listed in the Aliases section of the server. Leave it as "Current" unless you have a special reason to change it.
After selecting the server and database click OK to save the changes. Ignore any error messages.
Exit and restart Power Clock.
If you made shortcuts on the workstations to load the client from the server then you will not have to repeat the steps of setting the data location. The workstations will locate the server automatically.